Low Voltage Installation

  • Mounting the transformer
    • Mount the transformer next to a grounded indoor or outdoor outlet. If the transformer is installed outside, mount it at least one foot above the ground. It can be mounted on a wall, fence, post, etc. Follow the installation instructions provided with your power console.
  • Hiding the cable
    • Because you are working with low voltage, hiding the cable is simple. You may choose to cover it with some soil, mulch or other landscape dressing. Or if you are close to bushes or dense shrubbery, you can push it underneath and out of sight. You could also lay it along a fence or foundation nearby.
    • If you are crossing a lawn, you will want to wedge the surface at a 45-degree angle. Pull up the sod, place the cable at least 4″ deep (to prevent future problems if the lawn is aerated) and replace the sod firmly.
  • Note:  The National Electrical Code states that the minimum depth for low voltage wire is 6″ underground. 

Installing the fixtures

Each fixture is packaged with installation instructions that will tell you step by step how to properly install your system. The following sections were designed to supplement the instructions for fixtures that need extra care.

  • Inground fixtures
    • Ingrounds require some extra attention. They provide an unobstructed view of the landscape at night. Inground fixtures should be used primarily where they will remain permanently. For example, they could be used to light buildings, fences, mature trees, flag poles, etc. However, when installing an inground beneath a tree, do not forget cutting roots that may severely damage the tree, or even kill it. Try to use fixtures that are less than 12 inches deep for tree uplighting when placing the fixture under the canopy of the tree.
    • Another consideration to make with ingrounds is drainage capability. Because the fixtures are inground, there is always the problem of moisture. Provide a minimum 3″ drainage bed of granular material as recommended in the packaged instructions. Sealing the fixture as recommended in the packaged instructions will help ensure warranty coverage.
  • Underwater fixtures
    • Underwater fixtures are designed to enhance the natural beauty of a fountain, reflecting pool, or fishpond. The fixtures should be composite or brass with a watertight seal around its lens. We recommend using LEDs or 10,000 hour MR16’s light bulbs underwater applications. The fewer times you have to get into the fixture to relamp it, the better – underwater lights are all about maintaining a good, air-tight seal.
  • Tree lighting fixtures
    • When lighting a tree, you may choose to either light from the ground up, or you may want to actually mount some fixtures in the tree itself. It is a special situation when you think about mounting fixtures in a tree. Unlike soil and cement, trees are living things and require special attention. Since trees come in all different shapes and sizes, there are several ways to enhance them. You will not want to light an evergreen the same way you light a chestnut.
    • Here are some installation methods for lighting various types of trees from the ground:
      • Conifers (Conical Evergreens) – The foliage is dense and narrow. Place fixtures away from the base and aim light toward the top of the tree.
      • Flowering Deciduous (Dogwood, Fruit) – Place the fixtures away from the base and aim toward the top. Their beauty is at the tips of their branches where blossoms and fruit grow.
      • Deciduous, Dense Canopy (Oak, Maple Chestnut) – Place fixtures along the outer edges to focus light into the foliage. These trees have interesting bark and elaborate branch structures. Use more than one fixture to highlight these areas.
      • Deciduous, Open Canopy (Birch,Walnut, Palms) – These open canopies and palms can be grazed with light from underneath. Place the fixtures close to the base of the tree. Avoid the moonlighting technique with these trees.

Moonlighting with Low Voltage Fixtures

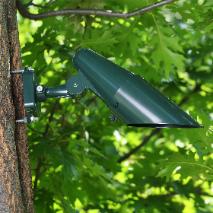
Undeniably one of the most beautiful landscape lighting techniques, moonlighting, simulates the natural light of a full moon, filtering through the branches of a tree. Moonlighting involves the placement of fixtures on the tree itself. Therefore, special care has to be taken when deciding where to place your fixtures.

  • The first thing to consider is that lamps in the fixtures will most likely not be easy to change when they burn out… for this reason, we recommend using LEDs or at least 10,000 hour MR16 lamps. Who wants to climb a 20 foot tall tree every 18 months to change the light bulb???
  • The second consideration is the means of fastening the fixtures. You must use fasteners that are constructed of stainless steel or cadmium-plated steel. Never use brass or copper fasteners in a tree. Brass and copper oxidize over time, poisoning the tree. Your fasteners should also be adjustable to allow for growth, upward and outward. We suggest using the TM kit with its combination lag screws to secure the mounting canopy.
  • The supply cable should be attached to the tree trunk with plastic tree staples. Because they are plastic, as the tree grows, the plastic staple will snap but will not dig into the wire and sever your connection.
  • Care should be taken when aiming the fixtures to eliminate direct glare from the lamp and the long directional shrouds should always be used. Consider that the tree will lose its leaves in the fall.
  • When creating the moonlighting effect, remember to place one or two fixtures above the eye level aimed upward to illuminate the top of the tree’s canopy.
  • Colored lenses, such as the F33 (pale blue) or F66 (mercury vapor) can be added to all of our MR16 fixtures and will help to set different moods. Or consider using a Cool White LED lamp to get that “moonlight” cool, crisp, blue effect. Both are available to you in our on-line catalog. The number of fixtures placed in the downlighting position is dependent upon the physical size of the tree as well as the density of its foliage.