Low Voltage System Layout

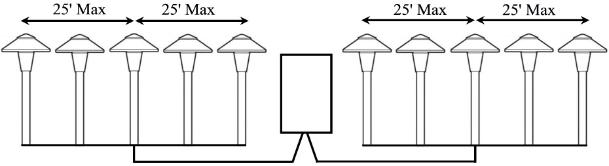
We have developed easy “rules” to follow to ensure that your low voltage system is installed with even voltage to all your fixtures. By following these rules, your DIY low voltage system will be installed like a professional, and will provide you with a low-maintenance, hassle free 12V system for years to come.

Low Voltage Installation Rules

  • Maximum of 5 fixtures per each #12-2 gauge wire run.
  • Maximum of 180 watts per each #12-2 gauge wire run.
  • Maximum distance of 50 feet from the first light on the run.
  • Maximum number of fixtures = 2 using the “Daisy Chain” wire method. (See picture below)
  • Use a center “ T ” wiring method for best results. Where you splice your wire into the middle fixture first, and then “T” off to the other 2 fixtures to the right and the left, while staying within 25ft. (See picture below)
  • To determine which voltage tap on your Multi-Tap Transformer you should be using, refer to our chart under Installing and Working With Multi-Tap Transformers. Remember the distances listed on the chart are the distances to the 1st fixture (or where you made your “T” connection
  • Make all connections at the fixtures using silicon filled wire connectors, stripping back the insulation a minimum of 1 inch. Although a lot of manufactures supply their fixtures with plastic “quick connectors”, we recommend that you throw those away, and use silicon filled wire connectors. This will ensure that over time, dirt, bugs, and other elements, will not disturb the connection.
  • Use Kleinhuis Cord grip (water-tight) connectors on all wires exiting the transformer.
  • Record which lamps you used for each fixture, including their wattages, on a separate sheet and keep it somewhere handy for the future.